
Reception main screen
The Main Reception Screen is the operational heart of the Reception module in your clinic management system. It allows receptionists to manage appointments, lab orders, patient check-ins, payments, and communications in one convenient interface.
Main Layout Overview
The screen consists of two main tabs:
Schedule Tab – Displays and manages all patient appointments.
Lab Orders Tab – Displays and manages laboratory-related orders.
Each tab provides its own interactive table, filtering tools, and access to patient actions.
Search & Filter Panel (Shared Features)
Located at the top of both tabs, the Search & Filter Bar helps staff quickly locate specific appointments or lab orders.
🔧 Available Filters:
Period Selector: Choose the time range (e.g., Today, This Week, Custom Dates) to display relevant entries.
Today Button: Quickly return to today's schedule or lab orders with one click.
Patient: Search by patient name to locate specific appointments or orders.
Doctor: Filter results by the assigned doctor.
Service: Narrow results by the type of service selected during booking.
Status: Filter by appointment or order status (e.g., Scheduled, Confirmed, Cancelled).
Pay Status: Filter entries by their payment status (Paid/Unpaid).
Show Canceled Appointments: Toggle this to show or hide canceled appointments in the view.
Select Columns: Allows users to choose which table columns should be visible, helping to declutter the view.

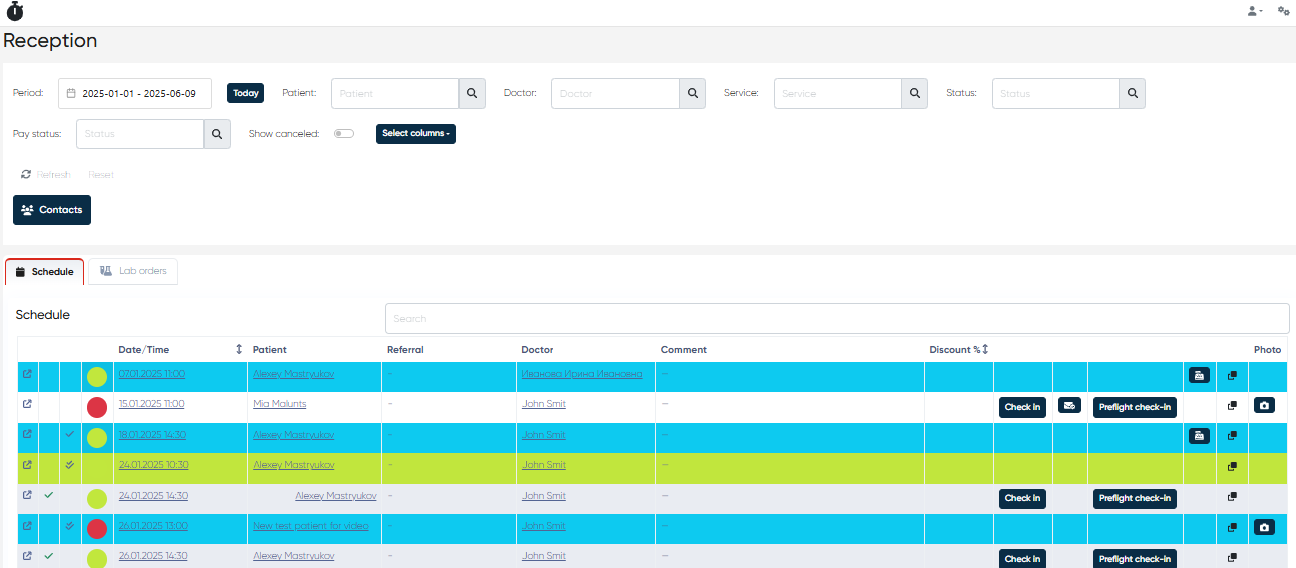
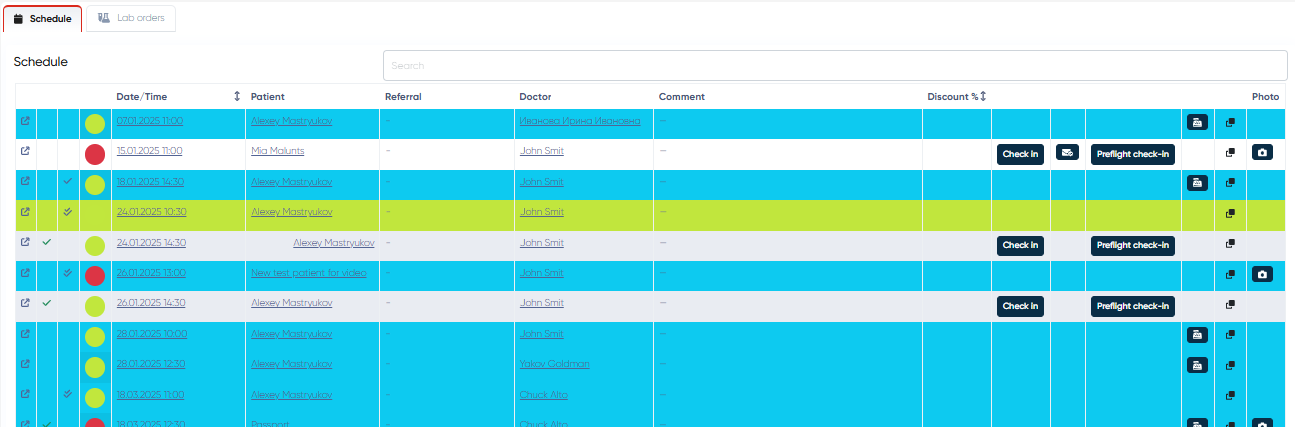
Schedule Tab – Managing Appointments
This tab displays all scheduled appointments in a sortable, searchable table. Each row represents one appointment, with the following columns:
Column | Description |
|---|---|
Open Appointment Info | Opens a detailed view of the selected appointment for review or editing. |
Confirmed/Not Confirmed | Visual indicator showing whether the appointment has been confirmed. |
Paid/Unpaid | Indicates whether the service has been paid for. |
Valid/Invalid Insurance | Flags insurance status for patients who use coverage. |
Date/Time | The scheduled date and time of the appointment. |
Patient | Displays the patient’s full name. |
Referral | Shows the referring source (e.g., another doctor or institution). |
Doctor | The doctor assigned to this appointment. |
Comment | Additional notes or instructions associated with the appointment. |
Discount % | Displays any discount applied to the service. |
Check-In Button | Allows staff to mark the patient as checked in (if not already done). |
Send Confirmation Button | Resend the confirmation message to the patient (email or SMS). |
Preflight Check-In Button | Initiates remote check-in process, including form completion. |
Pay Button | Opens the payment screen to record or process payment. |
Copy | Duplicates the appointment to quickly rebook a similar one. |
Photo (from the pad) | Displays patient image captured via check-in pad, if available. |
Visual Highlights:
Blue Background – Indicates that the patient has been checked in (default, color customizable).
Green Background – Indicates that payment has been completed (default, color customizable).
A secondary search bar below the main filters allows for on-the-fly filtering within the appointment list.
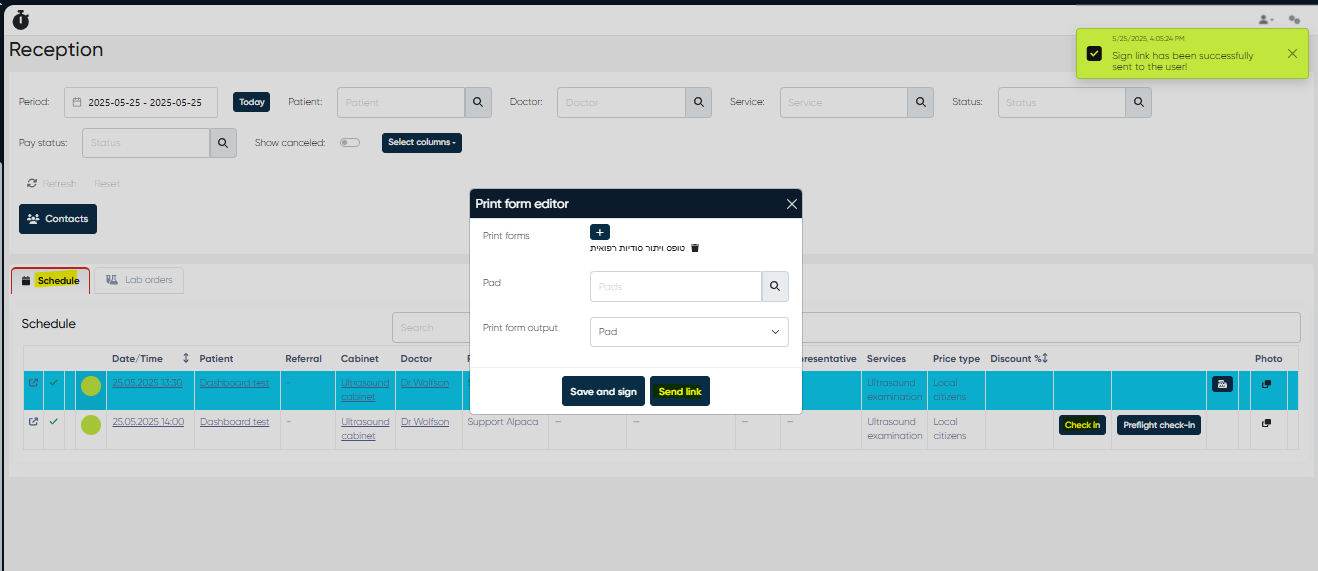
Sending Links to Patients for Remote Check-In Form Signing
Navigation:Reception → Schedule → Select Appointment → Check-In → Send Link
Overview
The Remote Check-In Form Signing feature allows reception staff to send secure, personalized links to patients so they can electronically sign check-in forms before arriving at the clinic.
This enhancement digitizes the pre-appointment workflow, reducing waiting times at the front desk and improving overall patient experience.
Functionality
When a patient has a scheduled appointment, staff can initiate the check-in process directly from the Schedule view.
By clicking Send Link, the system generates a unique, time-limited URL that the patient receives via SMS or email. The patient can open this link on any device to securely review and sign their assigned check-in forms.
The signed forms are automatically attached to the patient’s Medical Document and stored in their electronic record, ensuring compliance and easy retrieval.
How to Use
Navigate to Reception → Schedule.
Select the relevant appointment.
Click the Check-In button in the appointment menu.
Choose Send Link.
Confirm the patient’s contact channel (SMS or email).
Once sent, the patient receives a secure link to their check-in forms.
After the patient completes the signing, the system automatically updates their check-in status.
Notes
The link is secure and unique per patient and expires after a defined period (as configured by your system administrator).
Patients must complete all mandatory fields before submission.
The signed forms appear under the patient’s Documents tab and can be viewed by authorized staff.
This feature supports paperless operation and is ideal for telemedicine or high-volume clinics.
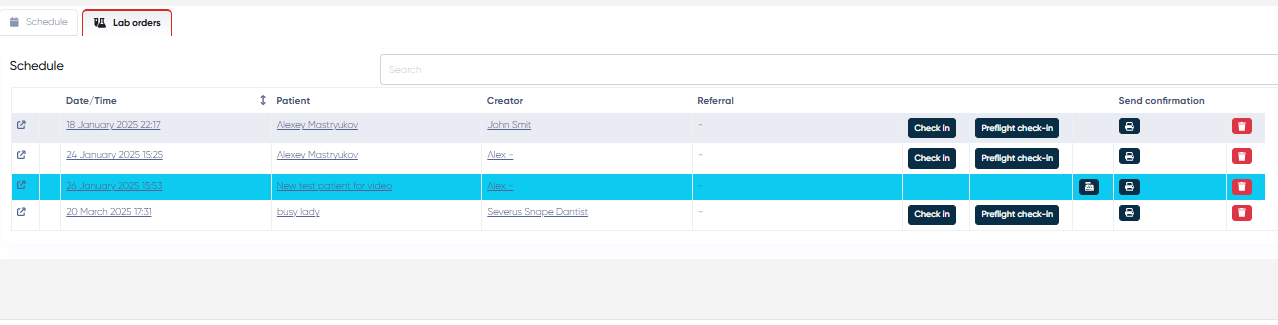
Lab Orders Tab – Managing Laboratory Orders
This tab contains all lab orders, which can be managed similarly to appointments. The table includes:
Column | Description |
|---|---|
Open Order Button | Opens detailed lab order information. |
Date/Time | Creation time of the lab order. |
Patient | The name of the patient is linked to the order. |
Creator | The user who generated the lab order. |
Referral | Referring doctor or source, if applicable. |
Check-In Button | Marks the lab order as checked-in, allowing services to proceed. |
Preflight Check-In Button | Initiates online pre-check-in for lab procedures. |
Pay Button | Opens the payment screen to complete billing. |
Send Confirmation Button | Sends a confirmation to the patient. |
Delete Order Button | Permanently deletes the lab order (access controlled by permissions). |
A secondary filter bar is also available below the search area to help staff quickly locate a specific lab order
. Contact Button

Available in both Schedule and Lab Orders tabs.
Opens the Contact List interface.
Allows the receptionist to:
Search for existing patients.
Add or update contact and profile information.
Access communication logs (e.g., SMS or email confirmations).
Use contact info directly for scheduling or follow-up.
Refresh and Reset Buttons
These two buttons

help streamline navigation and data management:
Refresh – Reloads the current tab (appointments or lab orders) without clearing filters. Use this if you're expecting new records to appear or want to ensure the data is up to date.
Reset – Clears all applied filters and search parameters, restoring the full default view of the tab. Ideal if your filters become too restrictive or confusing.
Both buttons are located below the filter section, easily accessible in both tabs.
User Tips:
You can use Select Columns to customize your view.
Use the Contact button any time you need to view, edit, or add patient details.
Keep an eye on the status indicators (blue/green by default) to easily track check-in and payment statuses.
The Preflight Check-In feature is especially helpful for reducing wait times and ensuring form completion before visits.
Duplicate Accounts Management
Navigation:Directories → Contacts
Overview
The Duplicate Accounts Management feature is designed to help administrators and reception staff maintain clean and accurate contact data by identifying and resolving duplicate patient or contact records.
This functionality improves data integrity, reduces registration errors, and prevents fragmented patient histories within the clinical management system.
How It Works
The system compares existing contact records based on key identifiers such as Name, Phone Number, and Passport Number.
When potential duplicates are found, they are displayed in a consolidated list for review and action.
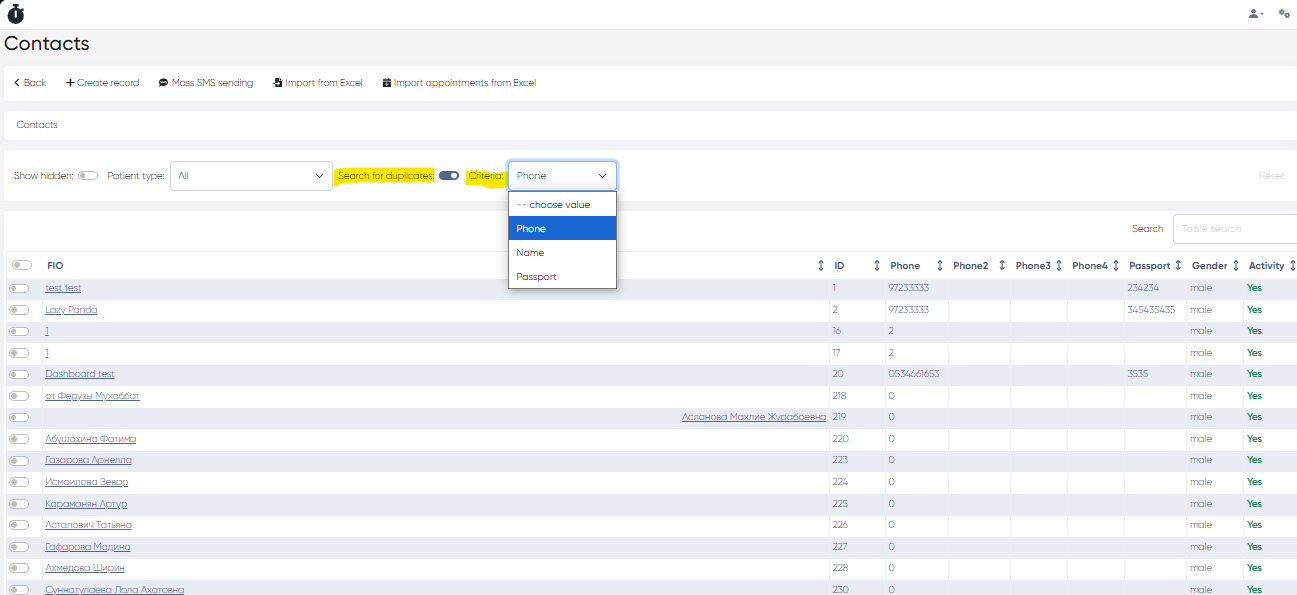
Detecting Duplicate Records
Navigate to Directories → Contacts.
Click the Search for duplicates button located in the toolbar.
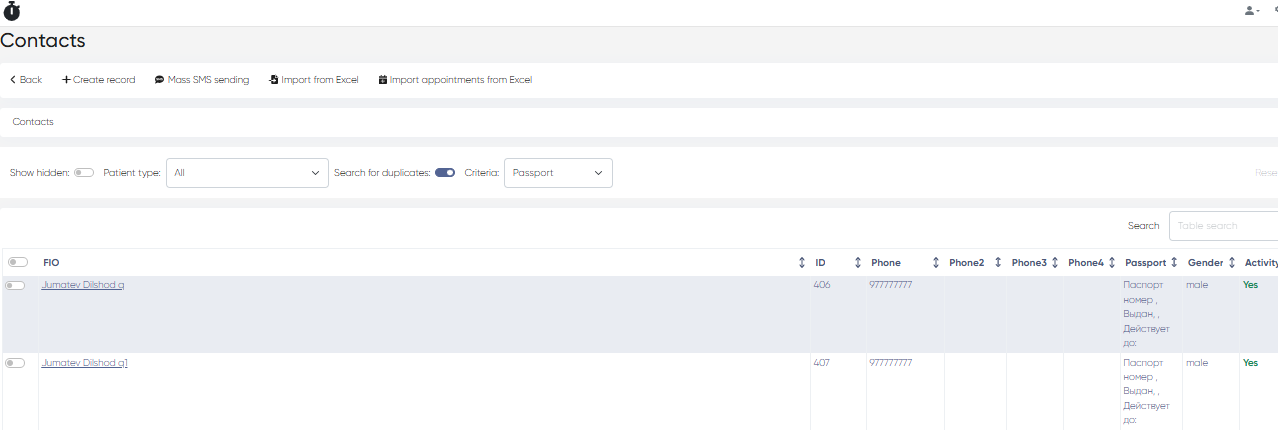
In the dialog that appears, select one or more matching criteria:
Name
Phone
Passport
Click Apply to initiate the search.
Potential duplicate records will appear in the contact list below, grouped for easy comparison.
Resolving Duplicates
Review each flagged record carefully to confirm whether it represents the same individual.
Merge or manually adjust the entries as needed to maintain accurate patient information.
Always verify critical identifiers such as phone numbers, passport IDs, and email addresses before merging.
Notes
The duplicate search can be run periodically to ensure ongoing data hygiene.
Only users with edit permissions for contact records can merge or delete duplicates.
It is recommended to perform a backup export before large-scale cleanup operations.