
Open schedule & Schedule editor
Open Schedule & Schedule Editor – Reception Module
The Open Schedule and Schedule Editor tools are designed to manage and customize the working time slots of clinic employees. These sections provide flexible scheduling, allow for status updates (e.g., vacation, unavailable), and support both daily and weekly slot configuration.
Accessing the Schedule Editor
To manage an employee's schedule:
Navigate to Directories > Employees.
Select the desired employee from the list.
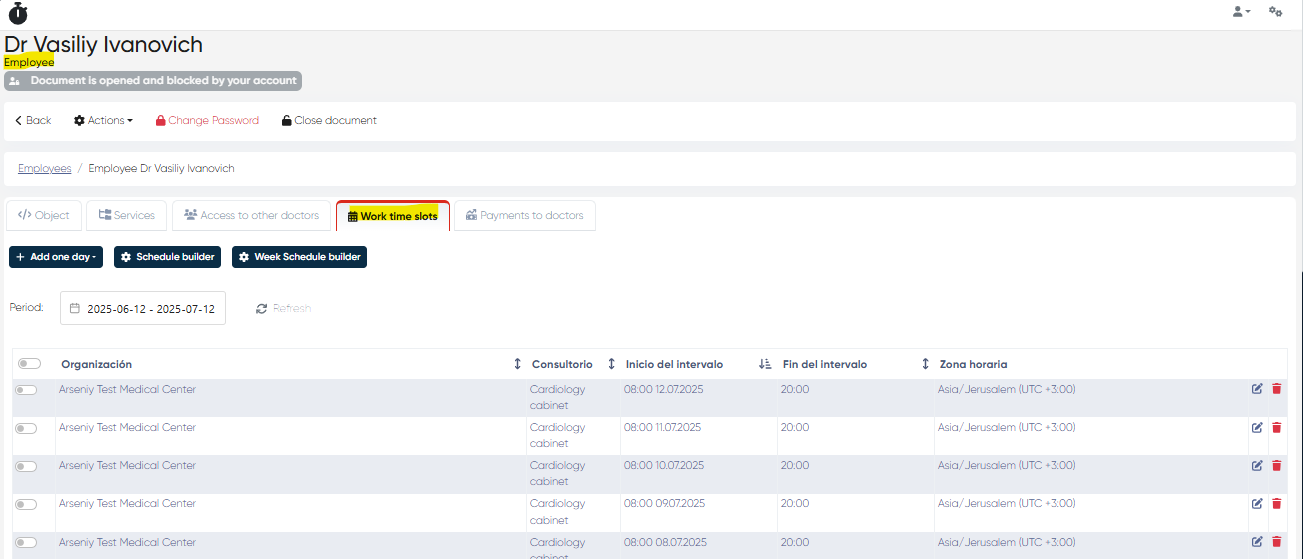
Open the Work Time Slots tab in the employee’s profile.
Schedule Table Overview
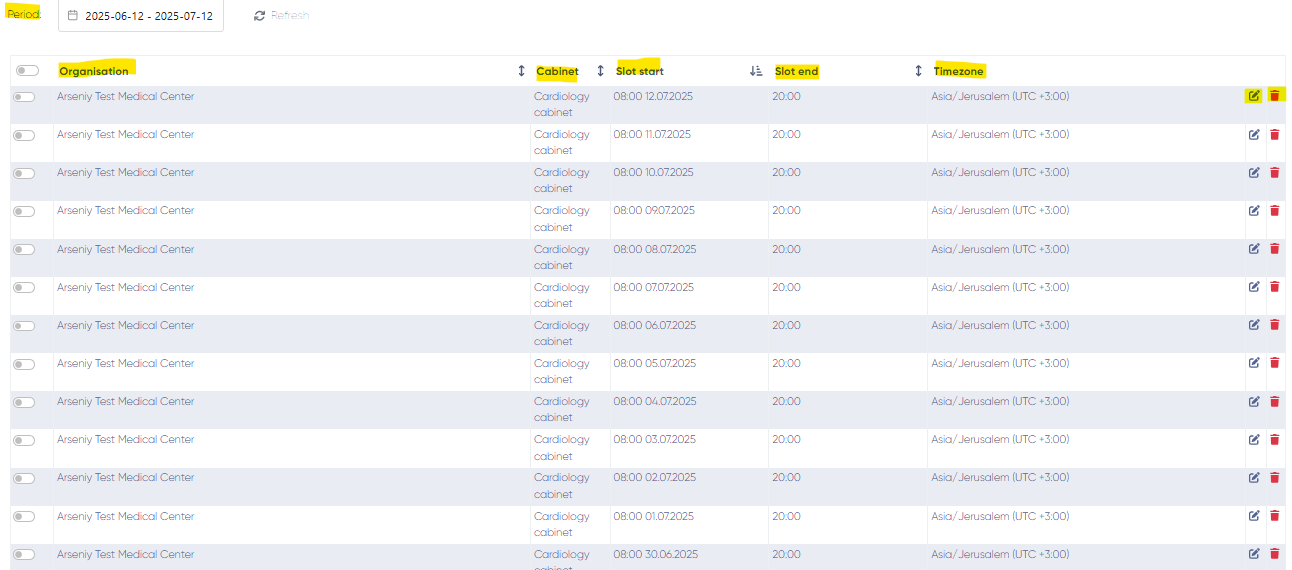
In the Work Time Slots tab, you'll find a table displaying all existing time slots for the selected employee.
Each row contains the following columns:
Organization – Clinic or facility name.
Cabinet – Assigned room or office for the appointment.
Slot Start / Slot End – Start and end time of the time slot.
Timezone – Time zone setting for the slot.
Edit – Opens slot details for changes.
Delete – Removes the slot from the schedule.
At the top, there is a Period bar that allows you to filter and display time slots within a selected date range.
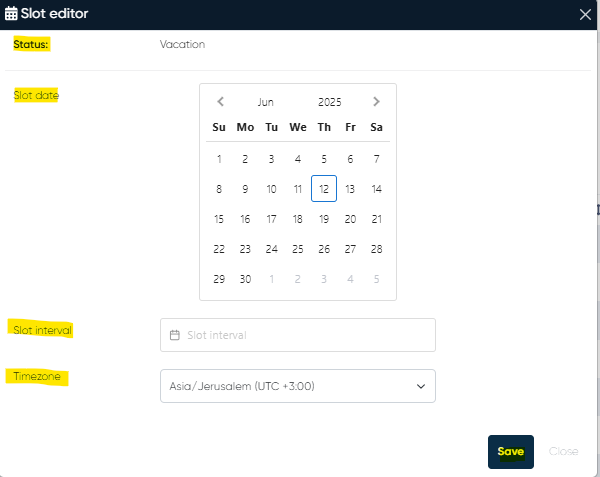
Adding a Schedule or Status (One-Day Mode)
Use the Add One Day button to configure a single-day schedule or status:
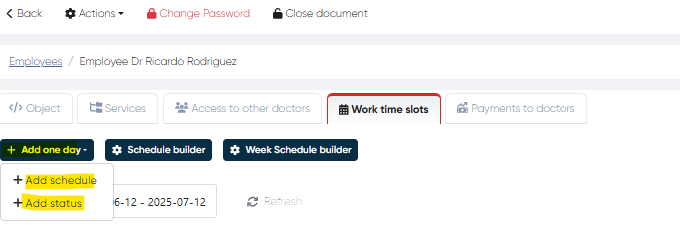
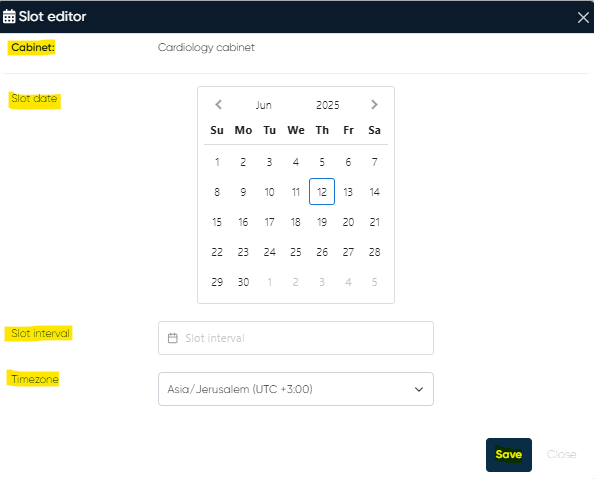
Add Schedule:
Select a cabinet from the list.
Set the date, time slot interval, and timezone.
Save the schedule to insert it into the table.
Add Status:
Choose a predefined status such as:Vacation
Business Trip
Other (custom statuses)
This status will block time slots for that day.
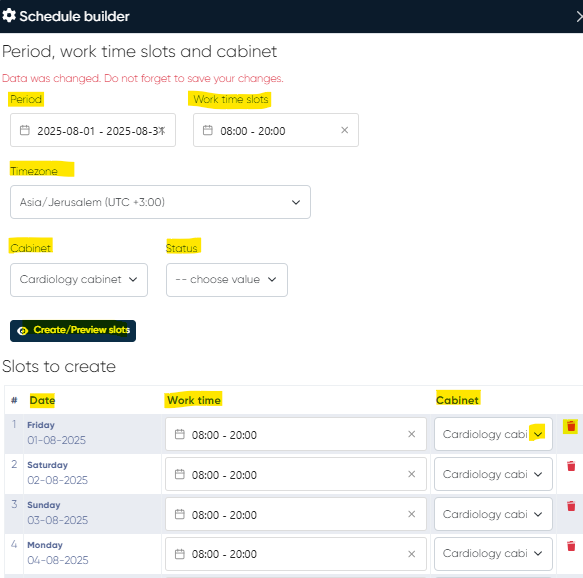
Schedule Builder
Click the Schedule Builder button to open a tool for creating multiple time slots over a period.
Schedule Builder Settings:
Period – Choose the date range for the slots.
Work Time Slots – Define the daily working hours.
Timezone – Set the relevant time zone.
Cabinet Dropdown – Select the cabinet where the employee will work.
Status Dropdown – Optionally assign a status (e.g., Working, Vacation).
Create/Preview Slots – Generates a preview table of time slots before applying them.
This tool is ideal for configuring multi-day or recurring schedules efficiently.
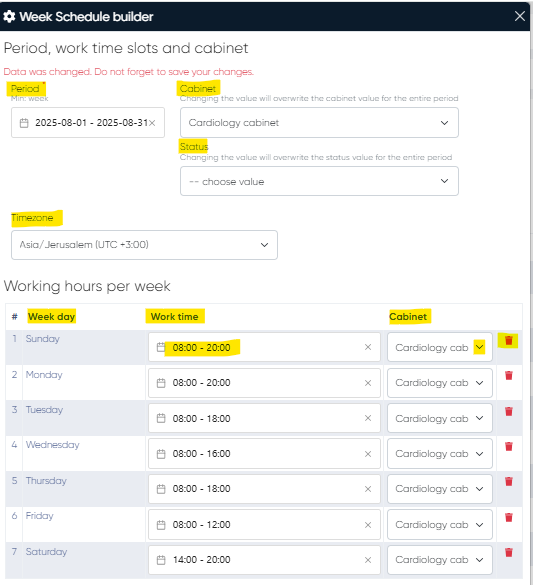
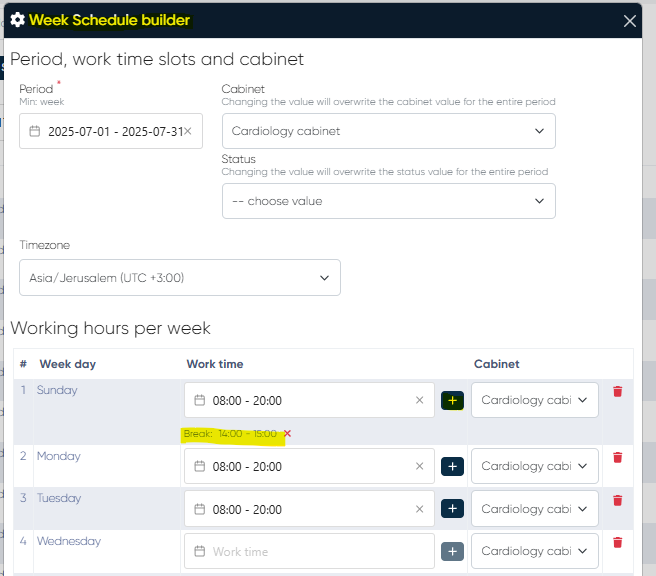
Week Schedule Builder
Use the Week Schedule Builder to generate weekly work schedules quickly.
Week Schedule Builder Settings:
Period – Minimum selection is 1 week.
Cabinet Dropdown – Assign a cabinet for each day or slot.
Status Dropdown – Choose the applicable status for the employee.
Timezone – Select the timezone for consistent slot creation.
Working Hours Table:
Displays a row for each weekday with the following editable columns:
Weekday – Day of the week.
Work Time Slot – Start and end time for the workday, can be customizable
Cabinet – Select the cabinet for the time slot.
Delete – Remove the row if not needed.
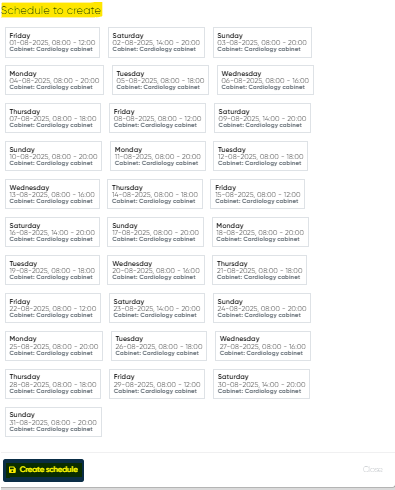
After configuration, slots are generated for the selected week(s), saving time and minimizing manual input. You will see the preview in the Schedule to create section of the week schedule builder, and for the slots creation, you need to push the Create schedule button.
Best Practices
Use the Week Schedule Builder for consistent weekly patterns.
Use Add One Day for last-minute changes or one-off statuses.
Always confirm the cabinet and timezone settings to ensure accurate booking availability.
Week Schedule Builder – Breaks Support
Module: Administration → Employee Scheduling
Navigation:Directories → Employees → Work Time Slots → Week Schedule Builder
Overview
The Breaks Support enhancement in the Week Schedule Builder allows administrators and staff to add break periods directly within daily work time slots.
This update provides more accurate control over employee availability, making it easier to reflect real work patterns and prevent appointments from being booked during non-working intervals.
Functionality
Breaks can now be defined and displayed alongside standard working hours in the Week Schedule Builder interface.
Each break is visually distinguished from active work slots, giving staff a clear overview of when the employee is available versus unavailable.
This feature is especially useful for defining:
Lunch breaks
Administrative or preparation time
Short personal or technical interruptions
The breaks are synchronized with the main scheduling system to ensure that no appointments are booked during these time slots.
How to Add Breaks
Navigate to Directories → Employees → Work Time Slots → Week Schedule Builder.
Select the employee for whom you wish to define breaks.
Choose the date range or scheduling period.
Identify the desired day and time in the grid.
Click to add a break slot within the schedule.
Adjust the start and end time of the break as needed.
Click Save to apply the changes.
Once saved, the break will appear in the schedule as a blocked interval that cannot be booked for appointments.
Benefits
Accurate employee availability management.
Reduces scheduling errors by clearly marking non-working times.
Improves work–life balance visibility by respecting staff breaks.
Synchronizes seamlessly with Reception and Doctor’s Cabinet modules to prevent double-booking.
Notes
Breaks can be created for any employee with defined working hours.
Only administrators or users with schedule editing permissions can modify breaks.
The system automatically prevents appointment creation during defined break periods.
Break data is visible in both Week Schedule Builder and the Doctor’s Cabinet calendar.
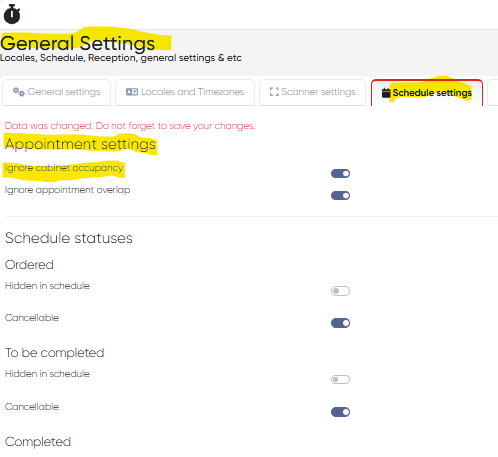
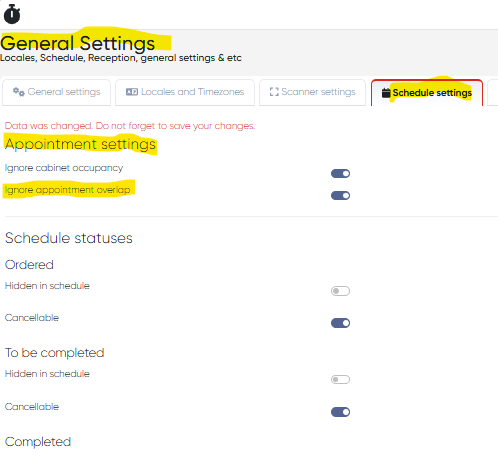
Advanced Scheduling Options
Navigation:
Settings → General Settings → Schedule Settings → Appointment Settings → Ignore Cabinet OccupancySettings → General Settings → Schedule Settings → Appointment Settings → Ignore Appointment Overlap
Overview
The Advanced Scheduling Options provide greater flexibility for clinics that require non-standard scheduling workflows, such as shared spaces, group sessions, or virtual consultations.
Two new configuration switches — Ignore Cabinet Occupancy and Ignore Appointment Overlap — allow users to bypass standard schedule restrictions when necessary, ensuring the system adapts to unique operational needs.
Ignore Cabinet Occupancy
Purpose:
Allows users to schedule appointments in a time slot even if the cabinet (office) is already marked as occupied.
This setting is particularly useful for scenarios such as:
Virtual consultations where no physical room is required.
Shared workspace environments where multiple specialists operate simultaneously.
Administrative bookings that do not depend on room availability.
How to Configure:
Navigate to Settings → General Settings → Schedule Settings → Appointment Settings.
Locate the Ignore Cabinet Occupancy toggle.
Enable the option.
Click Save to apply changes.
Once enabled, users can book new appointments in already-occupied cabinets without system restrictions.
Ignore Appointment Overlap
Purpose:
Permits scheduling of appointments that overlap with existing ones.
This option supports advanced scheduling scenarios such as:
Group therapy sessions or classes.
Parallel appointments handled by multiple assistants.
Overbooking policies for high-demand specialists.
Telehealth or hybrid sessions where physical presence is not limited by a time slot.
How to Configure:
Navigate to Settings → General Settings → Schedule Settings → Appointment Settings.
Find the Ignore Appointment Overlap toggle.
Enable the option.
Click Save to confirm.
After activation, the system will allow creating new appointments within occupied time frames without displaying overlap warnings.
Benefits
Flexible scheduling control for clinics with dynamic operations.
Supports virtual and group workflows without physical constraints.
Enhances administrative autonomy, reducing unnecessary scheduling blocks.
Improves resource utilization in shared-space environments.
Notes
Use with caution — enabling both options removes standard conflict checks.
Permissions should be limited to administrators or lead schedulers to prevent accidental overbooking.
Changes take effect immediately after saving configuration.