
Lab integration
Lab Integration – EHR Module
The Lab Integration section of the EHR module enables comprehensive management of laboratory workflows directly from the medical system. It supports both real-time and deferred lab order creation, integrates with lab equipment and external lab systems, and ensures smooth coordination between doctors, reception staff, and lab technicians. Key features include customizable test directories, barcode generation, grouped testing via complex protocols, and built-in order/result documentation tools.
1. Creating Lab Test Orders
Lab orders can be initiated through two main workflows:
New Touch > Complex Form – suitable for new patient contacts or administrative processing
Medical Document – for ongoing patient encounters during clinical consultations
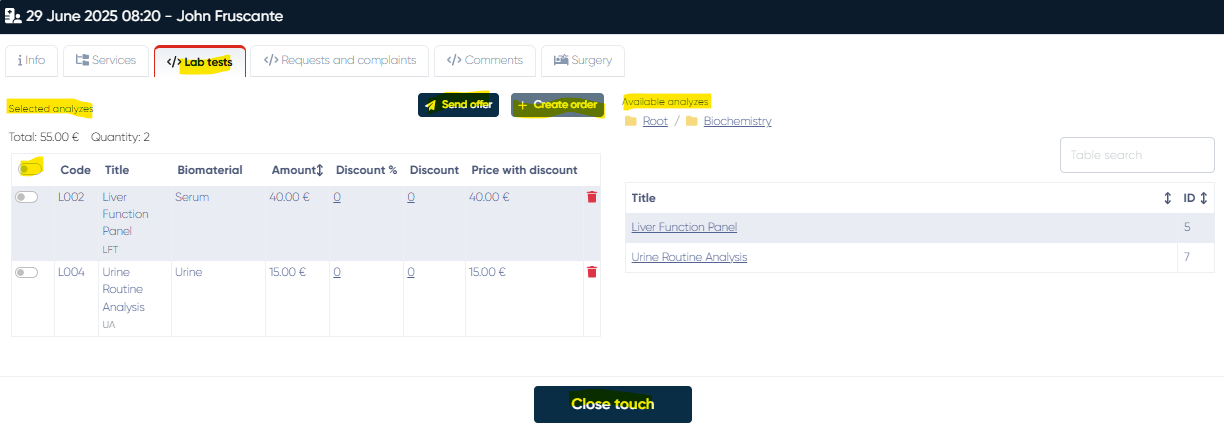
A) From Complex Form
Navigation:New Touch > Search/Create Patient > Complex Form > Lab Tests Tab
Main Features:
Available Analyzes Table:
A searchable master list of all registered lab tests. Clicking a test adds it to the selection list below. This allows quick building of a lab test set per patient.Selected Analyzes Table:
Displays the tests chosen for the current case.
Columns:Service selection toggle
Code
Title
Biomaterial (linked container)
Amount (quantity)
Discount % and Discount in currency
Price after discount calculation
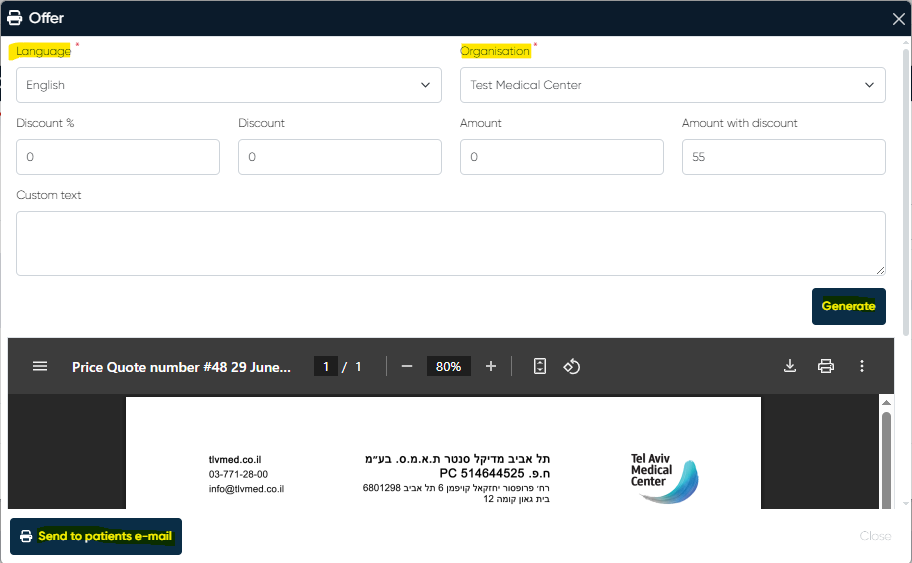
Send Offer Button:
Opens a price offer configuration window where users can:Choose display language
Select the organization issuing the offer
Configure discount as a percentage or fixed amount
Add a comment for internal or external use
After configuration, options include:
Generate a downloadable price quote
Send the offer directly to the patient's email
Create Order Button:
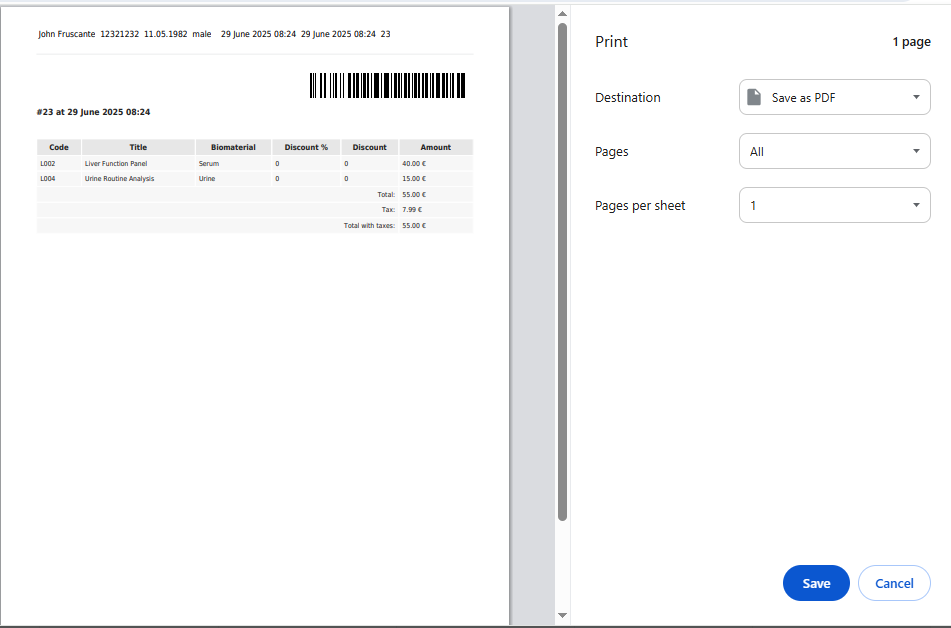
Once tests are selected and finalized, this button creates official lab orders. A confirmation step prevents accidental submissions. A printable or downloadable lab order summary is generated for each confirmed order.
Important: Once orders are created, users must close the Touch with any medical notes, observations, or administrative comments to ensure proper system tracking.
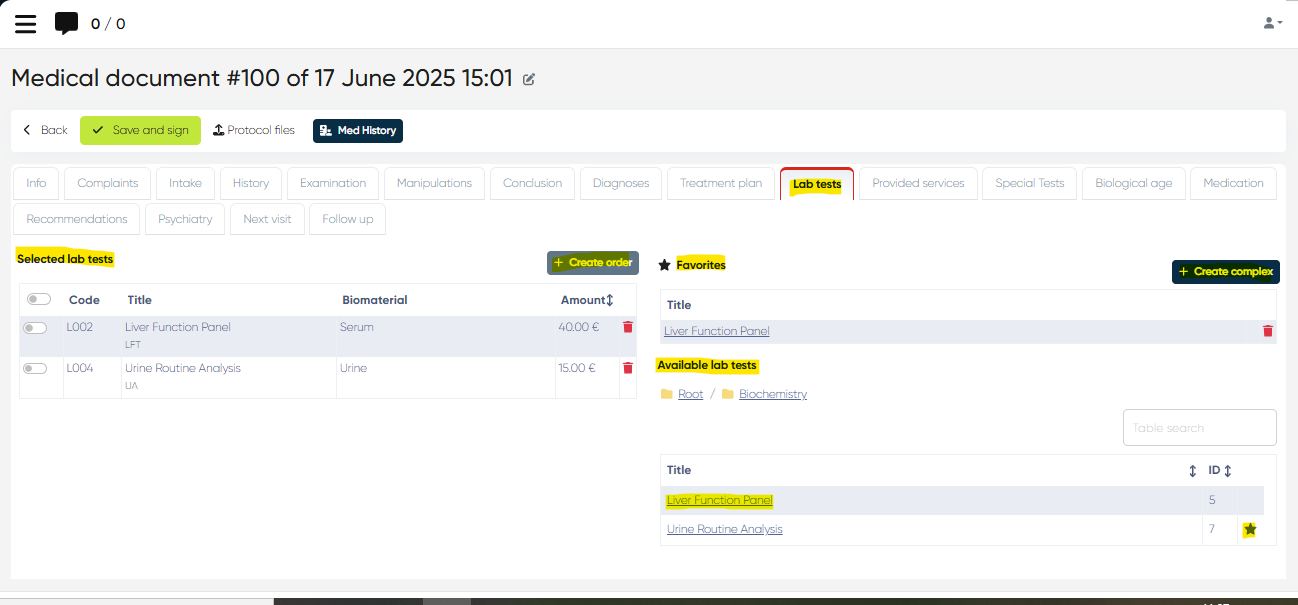
B) From Medical Document in Doctor’s Cabinet
Navigation:Directories > Employees > Choose Employee > Choose Appointment with check-in > +MedDoc > Lab Tests Tab
Main Features:
Available Lab Tests Table:
Like the Complex Form tab, this section lets the doctor add tests via search and selection. Integration with patient history ensures test relevance.Favourites Table:
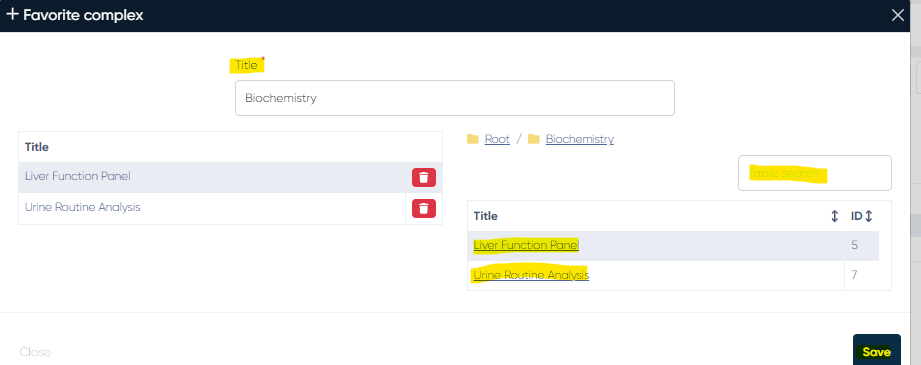
Commonly used or custom test bundles can be saved and reused here.Use +Create Complex to define multi-test protocols (e.g., gynecological panel, IVF workup).
Set a custom title and include multiple lab tests per complex.
Favourites can be edited or deleted. Simple individual tests can only be removed.
Selected Lab Tests Table:
Columns:Selection checkbox
Code
Test title
Biomaterial
Price/Amount
Delete button for each entry
Create Order Button:
Used to finalize and submit the lab order. Triggers confirmation and stores the data under the patient's profile.
2. Viewing Lab Orders via Reception
Navigation:Reception > Lab Orders
This view centralizes tracking for lab orders from all doctors and departments.
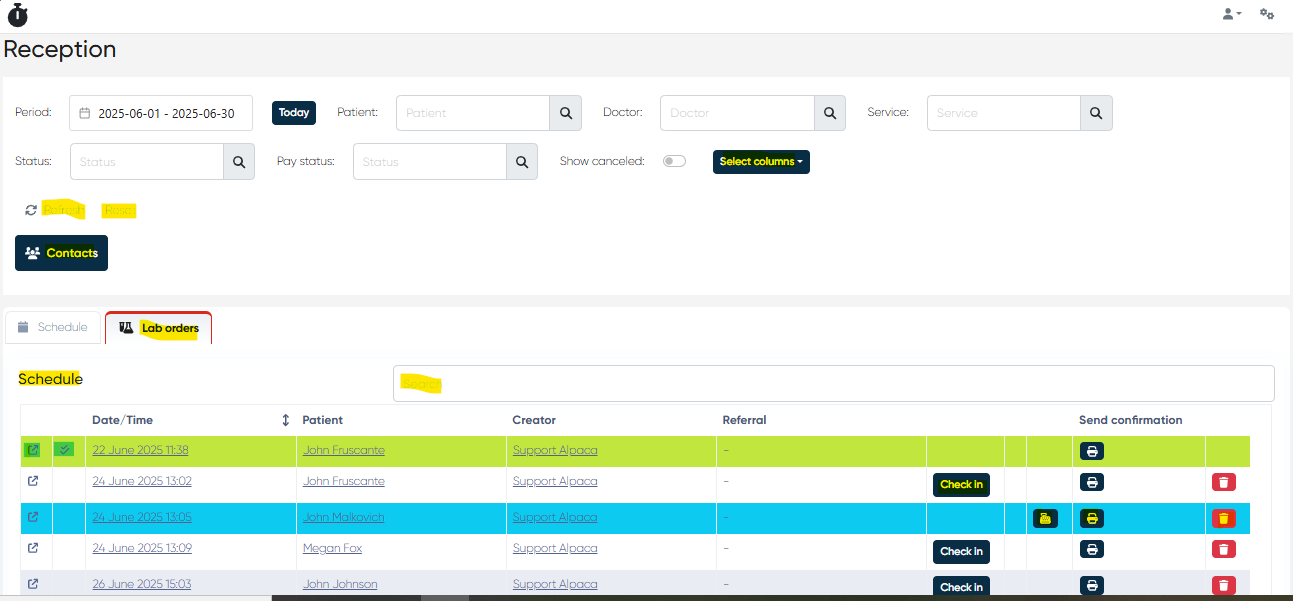
Filtering & Search Tools:
Period Selector (with calendar and Today shortcut)
Search by Patient, Doctor, Service, Status
Show Canceled toggle to include voided orders
Select Columns lets users customize the grid (e.g., show partner, comments, representative)
Contacts button opens the patient contact data
Refresh / Reset for data updates or default restore
Lab Orders Table – Default Columns:
Open – view or update the order summary and lab results
Paid/Unpaid status indicator
Date & Time
Patient Name
Creator (who placed the order)
Referral (if applicable)
Check-In – for marking sample collection
Pay – enabled post-check-in if payment is pending
Send Confirmation – generates order documentation for printing/saving
Delete – removes the order (if allowed)
3. Lab Orders View via Laboratory Section
Navigation:Laboratory > Lab Orders
Tailored for lab staff responsible for sample processing, barcode management, and result tracking.
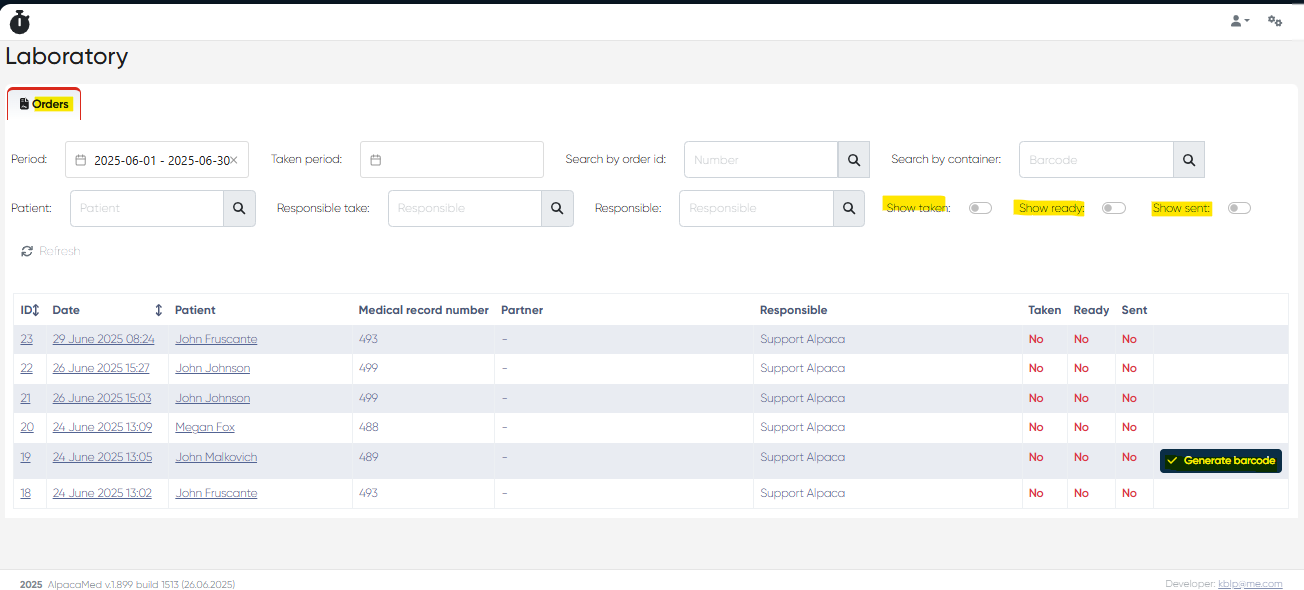
Filtering & Functional Tools:
Date ranges: General period and Taken period
Search by Order ID or Container ID
Filters for Patient, Responsible Take, Responsible Staff
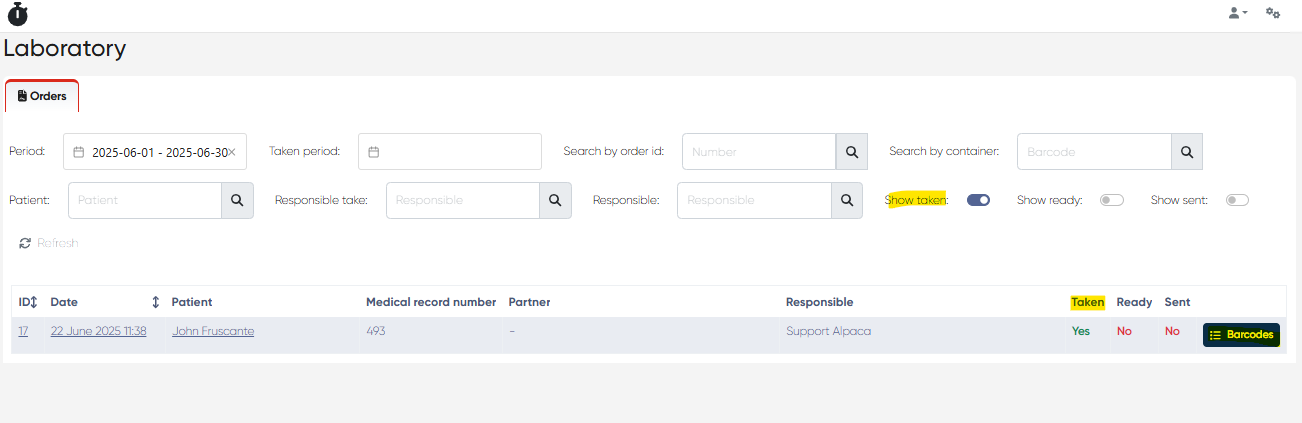
Toggles to show:
Taken orders (samples collected)
Ready orders (results completed)
Sent orders (results delivered)
Refresh to sync data with the latest changes
Lab Orders Table – Key Columns:
Order ID
Creation Date
Patient Name
Medical Record Number
Lab Partner (if outsourced)
Assigned Technician/Responsible Person
Status Flags: Taken | Ready | Sent
Generate Barcode (active for paid orders)
Barcode Viewer (for printed container barcodes)
4. Laboratory Settings
Navigation:Settings > Laboratory
This area allows fine-tuning of how lab orders and results are printed, barcode label parameters, and how external integrations (drivers) behave.
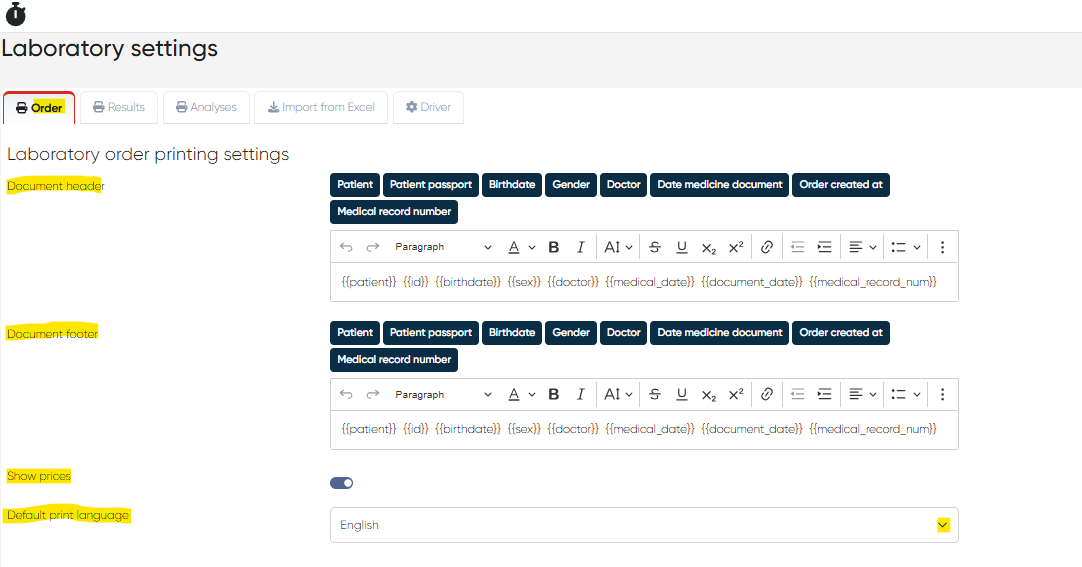
A) Order Tab – Order Print Customization
Header/Footer text areas with rich formatting
Insert variables (automatically filled during print):
{{patient}}, {{id}}, {{birthdate}}, {{sex}}, {{doctor}}, {{medical_date}}, {{document_date}}, {{medical_record_num}}Toggle Price Display in printouts
Default Language for printed documents
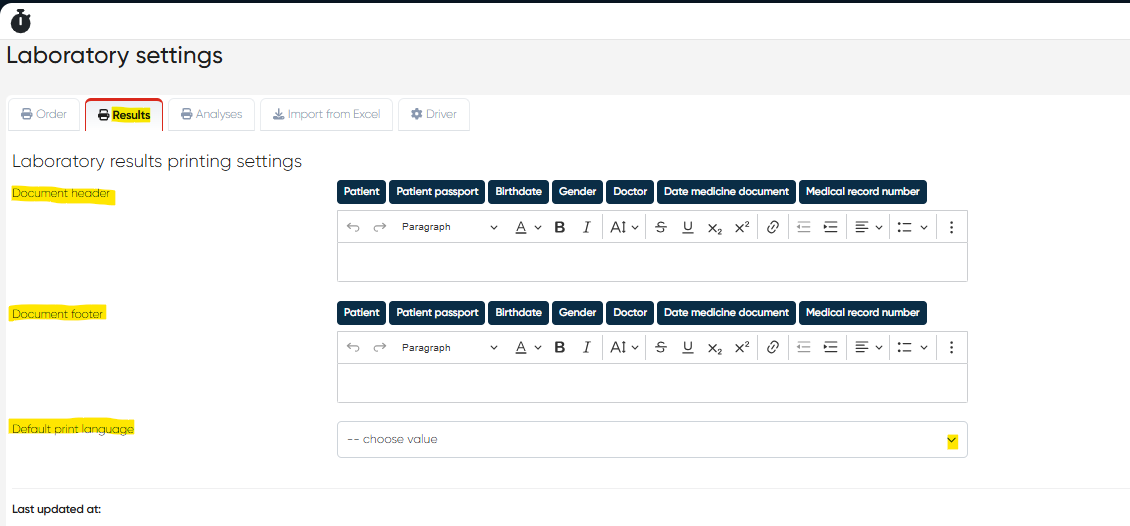
B) Results Tab – Results Print Customization
Same format/structure as Order tab
Helps tailor how final result documents appear for patients and doctors
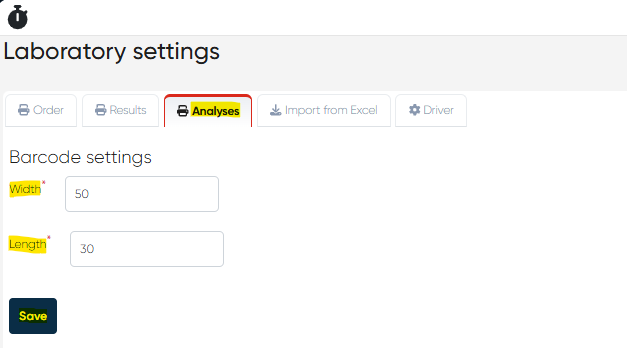
C) Analyses Tab – Barcode Configuration
Define barcode width and length for optimal printing on test tubes and containers
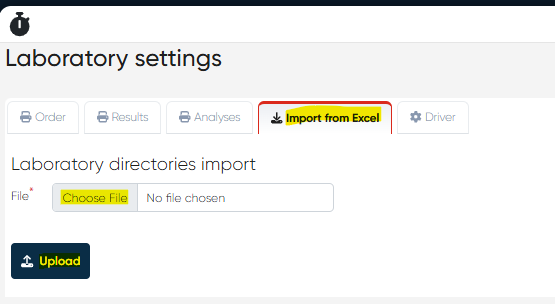
D) Import from Excel
Bulk import tool for:
Lab test catalogs
Containers
Norms and biomaterials
Accepts standard .xls/.xlsx files
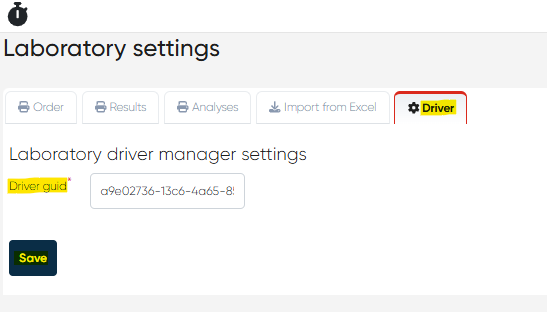
E) Driver
Allows configuration of external lab system drivers (e.g., equipment-specific or LIS)
Set the Driver GUID to establish correct system links
5. Manual Laboratory Data Entry via Directories
Navigation:Directories > Laboratory Dictionaries
Manual configuration of laboratory metadata. Allows admins or lab managers to customize system content and structure for testing protocols, biomaterials, containers, etc. There are a table of already created records and “Create new record” possibility for all laboratory directories.
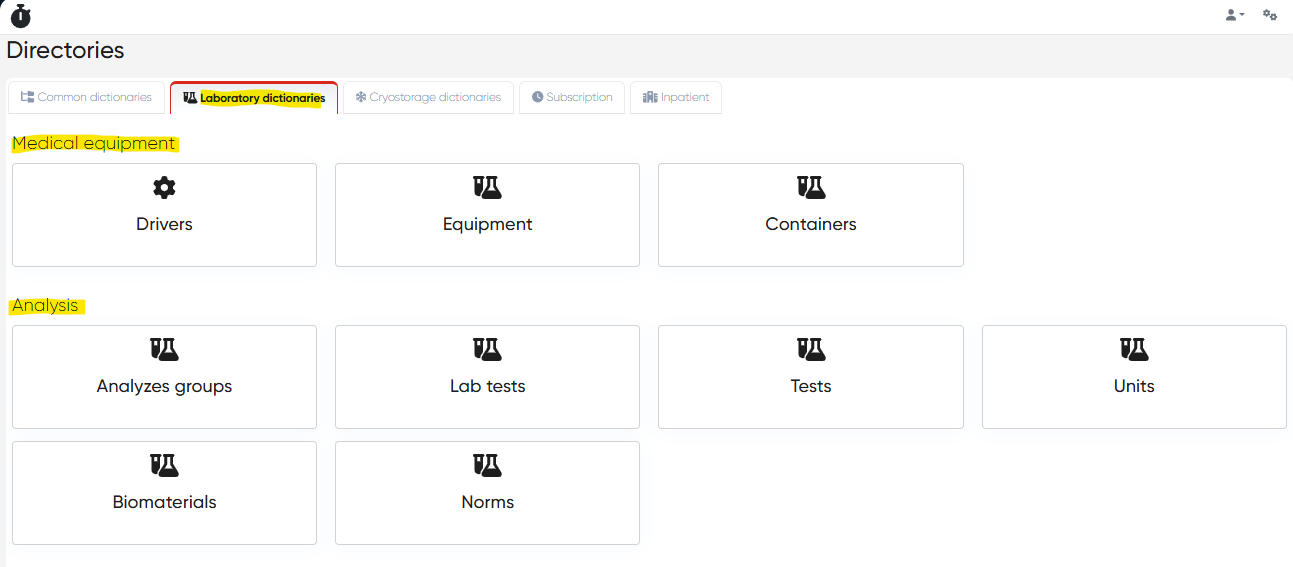
A) Medical Equipment
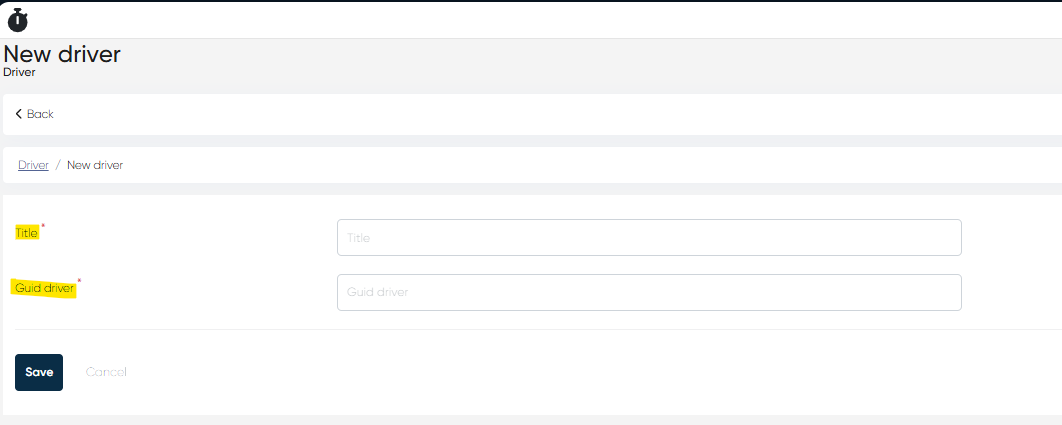
Drivers:
Defines integration connectors by GUID and display title.
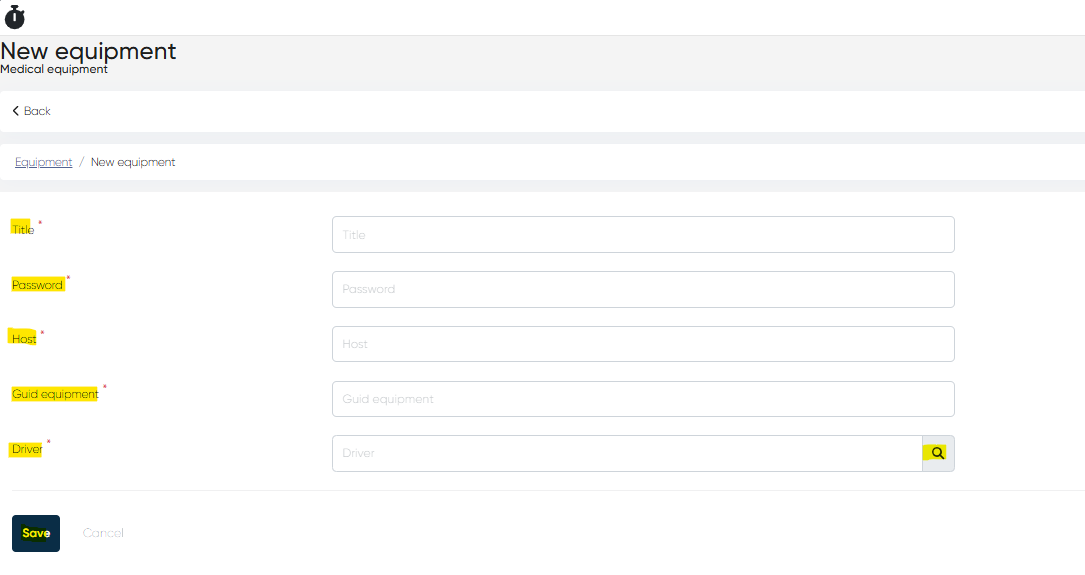
Equipment:
Required fields include to create the new record:Title, Password, Host (IP or URL), Equipment GUID, Driver (linked)
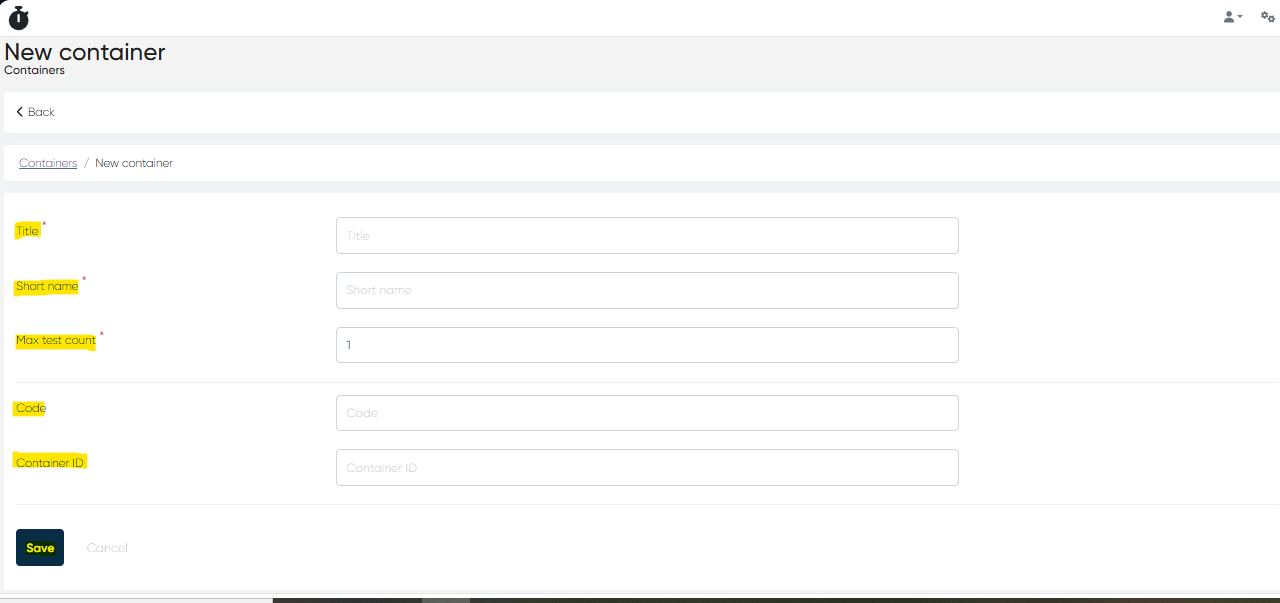
Containers:
Defines physical specimen containers.Title, Short Name, Max Test Count, Code, Container ID
B) Analysis Structure
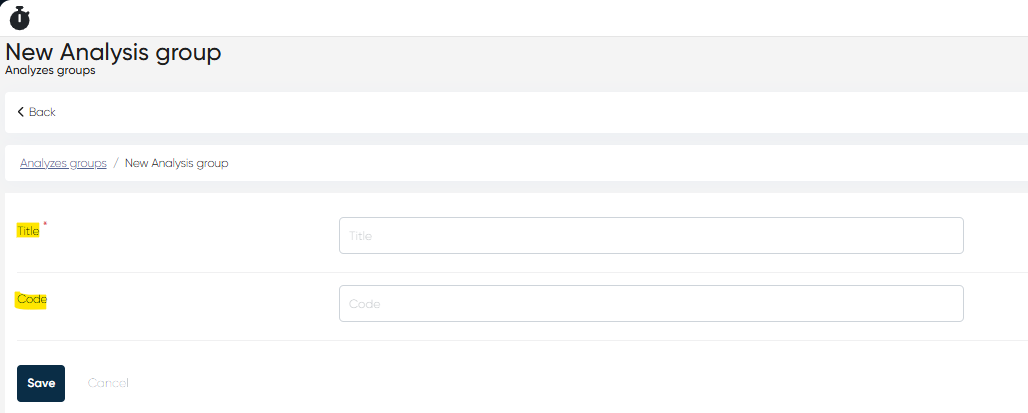
Analyzes Groups:
Organizational tags for sorting related tests (e.g., "Hormonal", "Immunology")
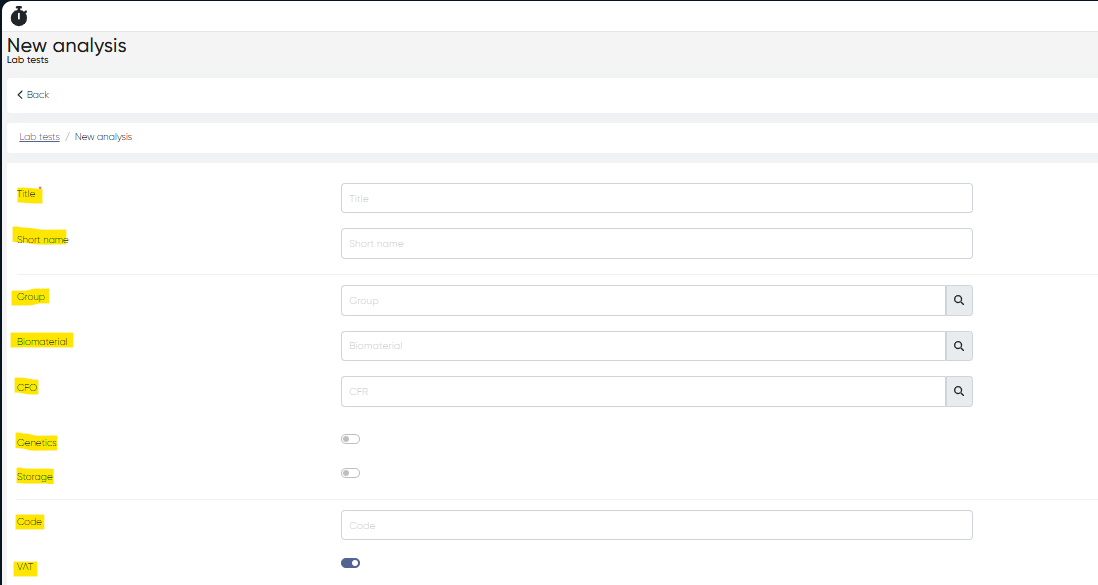
Lab Tests:
Main test catalog entries. Includes:Title
Short Name
Linked Biomaterial (e.g., blood, saliva)
CFO code
Genetic/Storage flags
VAT settings
Price
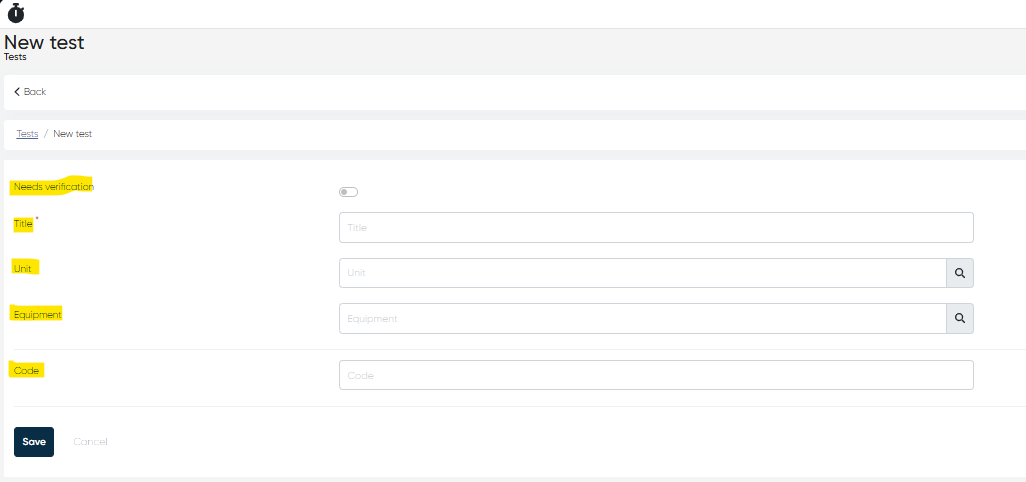
Tests:
Sub-level detail for each lab test. Fields include:Title
Unit (linked)
Linked Equipment
Internal Code
Needs verification (quality control flag)
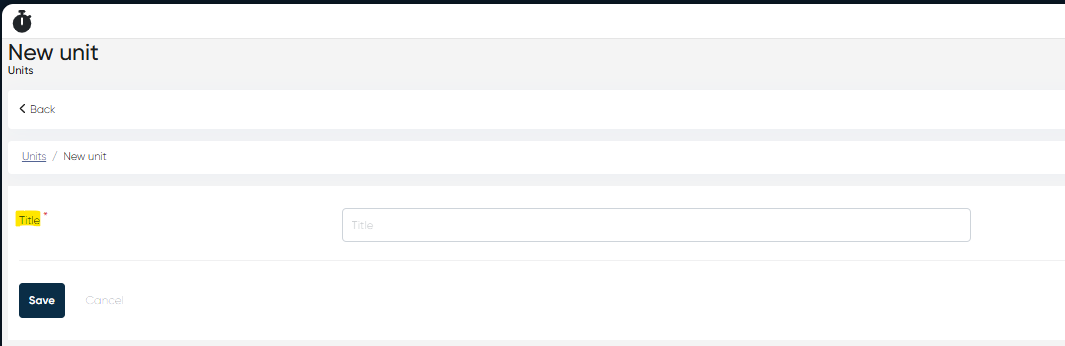
Units:
Standard units used for results (e.g., mg/dL, IU/L)
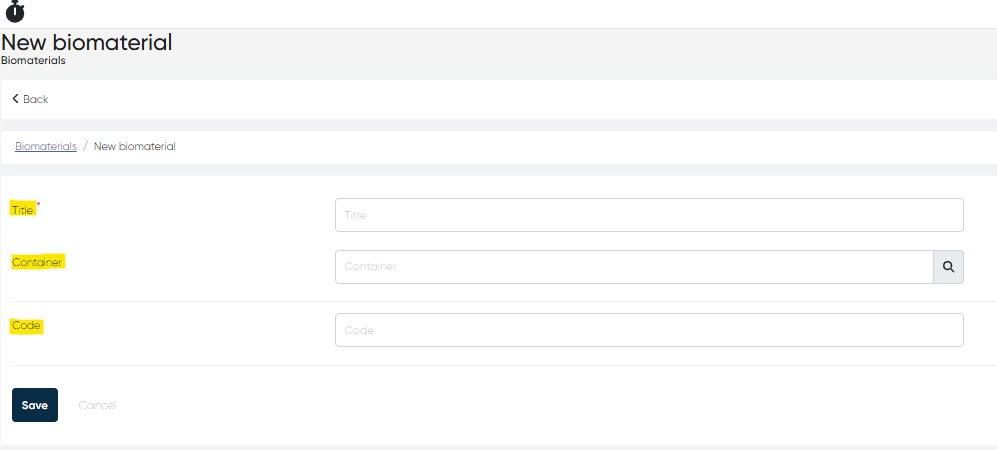
Biomaterials:
List of specimen types (e.g., Serum, Plasma). Includes linked container and code.
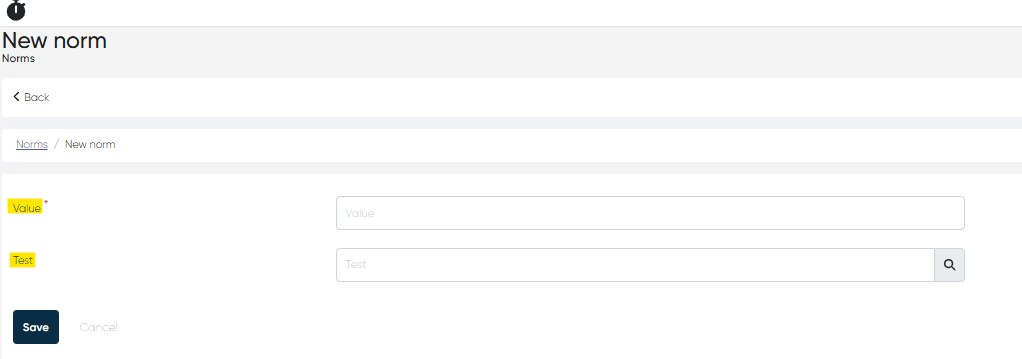
Norms:
Expected values for a test, which help define the result interpretation ranges.
The Lab Integration module is a core part of the clinical data lifecycle, allowing for seamless collaboration between front desk, doctors, and lab technicians. From rapid order entry and barcode tracking to data-rich result output, it ensures lab diagnostics are well-documented, traceable, and integrated into the patient’s medical history.